Search This Blog

Thursday, September 13, 2012


Windows 8 introduces significant changes to the operating system's graphical user interface and platform; such as a new interface design incorporating a new design language used by other Microsoft products, a new Start screen to replace the Start menu used by previous versions of Windows, a new online store that can be used to obtain new applications, along with a new platform for apps that can provide what developers described as a "fast and fluid" experience with emphasis on touchscreen input.[2] Additional security features were also added to the operating system, such as a built-in antivirus program and a secure boot feature on systems with UEFI firmware. Secure boot requires the operating system to be digitally signed to protect malware from infecting the boot process. The implementation of this feature has sparked controversy among supporters of free software. Windows 8 also introduces an edition of the operating system designed to run on devices that utilize the ARM architecture, known as Windows RT.

For more details ==> http://en.wikipedia.org/wiki/Windows_8

How to Configure Fast Cached Exchange Mode Settings for Outlook 2010 Using Group Policy


How to Configure Fast Cached Exchange Mode Settings for Outlook 2010 Using Group Policy  courtesy  of ==> http://www.expta.com/2010/10/how-to-configure-fast-cached-exchange.html


Microsoft introduced Cached Exchange Mode in Outlook 2003, and it's been the default configuration ever since.  Cached Exchange Mode saves a copy of your mailbox on your computer which provides quick access to your data and is frequently updated with the Exchange server.


Cached Exchange Mode works like this: When the Exchange Server notifies Outlook of a change, the Download timer starts and Outlook delays receiving the change information.  All notifications that occur in the 30 second window of the Download timer are grouped and processed as a batch at the end of the timer.  The timer is then reset.  Uploads to Exchange use a similar Upload timer, which lasts 15 seconds.  For more information, see Description of Outlook 2003 with Cached Exchange Mode in an Exchange Server 2003 environment.  This behavior is the same in Outlook 2007 and Outlook 2010.

While this configuration reduces network utilization and load on the target Exchange servers, it reduces the "perceived" performance of Outlook/Exchange.  Users who change from Online Mode to Cached Exchange Mode frequently complain about slow performance, since they're used to the almost "instant messaging" behavior of Online Mode.

This behavior can be changed using a simple registry change, or, as I recommend, using Group Policy.  By changing the Download, Upload, and Maximum timers to one second, your users will enjoy much improved email performance and you will still see improved network performance over traditional MAPI "Online Mode".

 Install the Fast Exchange Cached Mode GPO Administrative Template:
  • Download the CachedMode.adm Group Policy administrative template and save it to a temporary folder.
  • Open the Group Policy Management Console.
  • Navigate to the Default Domain Policy, right-click it, and choose Edit.
  • Navigate to User Configuration > Policies > Administrative Templates.
  • Right-click Administrative Templates and select Add/Remove Templates.
  • Click Add and browse to the location where you downloaded the CachedMode.adm template.  Click OK.
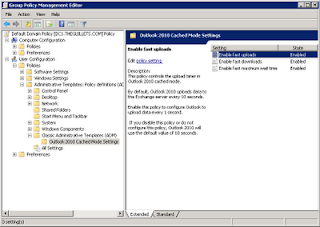
  • The Outlook 2010 Cached Mode Settings administrative template will be added under the heading "Classic Administrative Templates (ADM)".
  • Edit the Outlook 2010 Cached Mode Settings policy and Enable each of the three policies.


  • Close the Group Policy Management Console.
The Outlook users will need to download the new policy and either restart their computer or restart Outlook to get the new settings.

If you are a VPN user or a mobile user who cannot receive Group Policy settings, you can download the FastCachedMode.reg file, and install it manually.  Then close and re-open Outlook to get the new configuration.
Posted by Jeff at 1:19 AM http://www.blogger.com/img/icon18_email.gif
Labels: Exchange, Exchange Cached Mode, Outlook, Outlook 2010, tip, troubleshooting


How to Update the Offline Address Book

How to Update the Offline Address Book

Applies to: Exchange Server 2007 SP3, Exchange Server 2007 SP2, Exchange Server 2007 SP1, Exchange Server 2007
Topic Last Modified: 2007-01-02
This topic explains how to use the Exchange Management Console or the Exchange Management Shell to update an offline address book (OAB). After you create an OAB or modify OAB settings, the changes will not be available to users until the OAB generation (OABGen) process has completed.
For information about how to create OABs, see How to Create an Offline Address Book.
To perform the following procedure, the account you use must be delegated the following:
  • Exchange Organization Administrator role
For more information about permissions, delegating roles, and the rights that are required to administer Microsoft Exchange Server 2007, see Permission Considerations.
Also, be aware that the procedures in this topic will only start the update process. It can take from several minutes to several hours to complete the process. New content will not be available until the process is complete.
  1. Start the Exchange Management Console.
  2. In the console tree, expand Organization Configuration, and then click Mailbox.
  3. In the result pane, click the Offline Address Book tab, and then click the OAB that you want to update.
  4. In the action pane, click Update.
  5. Read the warning box, and then click Yes to continue.
  • Run the following command:
    Update-OfflineAddressBook -Identity 
    
    For example, to update the OAB named My OAB, run the following command:
    Update-OfflineAddressBook -Identity "My OAB"
    
For detailed syntax and parameter information, see the Update-OfflineAddressBook reference topic.
For more information about managing OABs, see the following topics:

Users not showing in Global Address List


Users not showing in Global Address List


When you are in cached mode, Outlook keeps a local copy of the GAL and it is called the offline address book - essentially, the OAB is "cached" on your local machine along with all contents of your mailbox so that if you are to get disconnected from Exchange, you can still continue reading and writing emails. The cached copy of the OAB is downloaded once in 24 hrs from the server but if the server does not generate the OAB properly then you will not get the latest details.

When you are in online mode, it simply means you are directly connected to Exchange and you are viewing everything directly from the server and nothing is stored locally on your machine.

You need to update the OAB directly from the server (http://technet.microsoft.com/en-us/library/aa997684(EXCHG.80).aspx). Make sure you increase diagnostic logging on the server for this process so you can see why these users do not show up!
How to Update the Offline Address Book
2 out of 7 rated this helpful - Rate this topic
Applies to: Exchange Server 2007 SP3, Exchange Server 2007 SP2, Exchange Server 2007 SP1, Exchange Server 2007
Topic Last Modified: 2007-01-02
This topic explains how to use the Exchange Management Console or the Exchange Management Shell to update an offline address book (OAB). After you create an OAB or modify OAB settings, the changes will not be available to users until the OAB generation (OABGen) process has completed.
For information about how to create OABs, see How to Create an Offline Address Book.


To perform the following procedure, the account you use must be delegated the following:
  • Exchange Organization Administrator role
For more information about permissions, delegating roles, and the rights that are required to administer Microsoft Exchange Server 2007, see Permission Considerations.
Also, be aware that the procedures in this topic will only start the update process. It can take from several minutes to several hours to complete the process. New content will not be available until the process is complete.


  1. Start the Exchange Management Console.
  2. In the console tree, expand Organization Configuration, and then click Mailbox.
  3. In the result pane, click the Offline Address Book tab, and then click the OAB that you want to update.
  4. In the action pane, click Update.
  5. Read the warning box, and then click Yes to continue.


  • Run the following command:

·         Update-OfflineAddressBook -Identity
For example, to update the OAB named My OAB, run the following command:
Update-OfflineAddressBook -Identity "My OAB"
For detailed syntax and parameter information, see the Update-OfflineAddressBook reference topic.


Friday, March 16, 2012

Friday, October 07, 2011

Steve Jobs in Memorian 1955-2011


Steve Jobs founder of Apple just died....The World has lost a Genius!
Steven Paul "Steve" Jobs (February 24, 1955 – October 5, 2011) was an American computer entrepreneur and innovator.


Words of Wisdom By Steve Jobs- Co founder of Apple:


“No one wants to die. Even people who want to go to heaven don't want to die to get there,” Jobs continued to say to the Stanford graduates in the 2005 address.

“And yet death is the destination we all share. No one has ever escaped it. And that is as it should be, because death is very likely the single best invention of Life. It is life's change agent. It clears out the old to make way for the new. “
“Don't let the noise of others' opinions drown out your own inner voice. And most important, have the courage to follow your heart and intuition. They somehow already know what you truly want to become. Everything else is secondary.”

Video of a bagpiper who played in front of the Apple campus: Courtesy of Robert Scoble

Video of a bagpiper who played in front of the Apple campus:

& Complete article at ==>> http://scobleizer.com/2011/10/06/my-apology-to-tim-cook-and-remembering-steve-jobs/

Tuesday, September 13, 2011

Windows 8 Unveiled! - Hot off the Press!

Sunday, September 11, 2011

Commodore C-64 is back from the past!


http://www.commodoreusa.net/j/C64KeysSmallBorder2b.png


"It's back... and better than ever! The new Commodore 64 is a modern functional PC as close to the original in design as humanly possible. It houses a modern mini-ITX PC motherboard featuring a Dual Core 525 Atom processor and the latest nVidia ION2 graphics chipset. It comes in the original taupe brown/beige color, with other colors to follow."


My first computer in fact was C-64 which I still own. 

Wednesday, July 20, 2011

Sunday, October 31, 2010

FavIcon Generator

PC Apple Consulting Logo


Use this FavIcon Generator online tool to easily create a favicon (favorites icon) for your site. A favicon is a small, 16x16 image that is shown inside the browser's location bar and bookmark menu when your site is called up. It is a good way to brand your site and increase it's prominence in your visitor's bookmark menu.

Friday, October 29, 2010

Have you lost photos by the new iPhoto 11 upgrade process?


It is true! IPhoto 11 can and will lose (read: delete!) most of your photos during the upgrade process

SOLUTION HERE:


http://iphoto11.wordpress.com/

Friday, August 27, 2010

Microsoft Security Essential Utilities


I recommend:

Microsoft Security Essential Utilities

Microsoft Security Essentials provides real-time protection to identify and eliminate harmful viruses and other malware from your PC

Thursday, January 08, 2009

How to Antivirus 2008 and Antivirus 2009

"Antivirus 2009 is a type of Rogue AntiSpyware Programs.

Rogue anti-spyware programs are fake applications that are cleverly disguised to behave like legitimate spyware removal programs. Rogue anti-spyware programs are usually created by hackers with the sole purpose of rendering a sale for the rogue application. Many rogue anti-spyware programs use deceiving tactics to entice computer users to purchase the rogue anti-spyware program. In many cases computer users do not realize that they have downloaded or installed a fake anti-spyware program until after the sale has taken place. Rogue Anti-Spyware Programs are bogus applications that usually require an extra effort to completely uninstall or remove from your system. Computer infections such as Trojans are known to install rogue anti-spyware programs which do not remove parasites or justify the abnormally high cost of the full version. "

http://www.spywareremove.com/removeAntivirus2009.html

Antivirus 2009 (or Antivirus Pro 2009) Descriptions:

Antivirus 2009, also known as Antivirus Pro 2009 or Antivirus 2009 Pro, is a series of rogue antispyware application that created to ruin the integrity of our computing experience. Antivirus 2009 is fake and malicious, with the intent of screwing up your computers. Antivirus 2009 is a clone of the infamous Antivirus 2008. It is somewhat ironic to see a fake antivirus application got upgraded. Guess we are living in an usual world and nothing really surprises us anymore. Generally, Antivirus 2009 usually comes up after you installed a video codec that come with Trojan, malware and virus. Antivirus 2009 normally generates fake and misleading system popup error messages so end-users will be tricked into purchase Antivirus 2009.

Screen shot of Antivirus 2009:
av09

(Screen shot of Antivirus Pro 2009)

It is more important that ever to remove all the components of of the Antivirus 2009, and all the malware and trojans that it might have come bundle with (such as zlob.trojan, trojan.vundo and Trojan.Downloader). We don’t want someone spying on our digital life, do we? To effectively and safely remove Antivirus 2009, we have created a manual removal instructions. Be sure to back the data up before proceeding. Good luck!

Download SpyHunter* Spyware Detection Utility

Manual Antivirus Pro 2009 Removal Instructions:

Stop Antivirus Pro 2009 Processes:
(Learn how to do this)
av2009.exe
av2009[1].exe
AV2009Install.exe
Antivirus2009.exe
utynewu.exe
install.exe
brastk.exe

Find and Delete Antivirus Pro 2009 Files:
(Learn how to do this)
av2009.exe
av2009install.exe
av2009install_0011.exe
av2009[1].exe
Antivirus2009.exe
ieupdates.exe
scui.cpl
%program_files%\antivirus 2009\av2009.exe
%startmenu%\antivirus 2009\antivirus 2009.lnk
%startmenu%\antivirus 2009\uninstall antivirus 2009.lnk
winsrc.dll
%desktopdirectory%\antivirus 2009.lnk
winsrc.dll
ieupdates.exe
av2009install_0011.exe
av2009install.exe
%program_files%\antivirus 2009\av2009.exe
%UserProfile%\Application Data\Microsoft\Internet Explorer\Quick Launch\Antivirus 2009.lnk
%UserProfile%\Desktop\Antivirus 2009.lnk
%UserProfile%\Start Menu\Antivirus 2009\Antivirus 2009.lnk
%UserProfile%\Start Menu\Antivirus 2009\Uninstall Antivirus 2009.lnk
%ProgramFiles%\Antivirus 2009\av2009.exe
%System%\scui.cpl
brastk.exe
icilosaqi.dll
install.exe
isygequdy.lib
wini101971.exe
wscui.cpl
_scui.cpl
antiviruspro2009.exe
avengn.dll
utynewu.exe
icilosaqi.dll
utynewu.exe
install.exe
brastk.exe
wini101971.exe
%program_files%\antiviruspro2009\uninstall.exe
%program_files%\antiviruspro2009\wscui.cpl
%programs%\antiviruspro2009\antiviruspro2009.lnk
%programs%\antiviruspro2009\uninstall.lnk
%program_files%\antiviruspro2009\antiviruspro2009.exe
%program_files%\antiviruspro2009\uninstall.exe
%desktopdirectory%\antiviruspro2009.lnk
%profile%\application data\microsoft\internet explorer\quick launch\antiviruspro2009.lnk
%program_files%\antiviruspro2009\antiviruspro2009.cfg
%program_files%\antiviruspro2009\antiviruspro2009.exe
%program_files%\antiviruspro2009\avengn.dll
%program_files%\antiviruspro2009\data\daily.cvd
%program_files%\antiviruspro2009\htmlayout.dll
%program_files%\antiviruspro2009\microsoft.vc80.crt\microsoft.vc80.crt.manifest
%program_files%\antiviruspro2009\microsoft.vc80.crt\msvcm80.dll
%program_files%\antiviruspro2009\microsoft.vc80.crt\msvcp80.dll
%program_files%\antiviruspro2009\microsoft.vc80.crt\msvcr80.dll
%program_files%\antiviruspro2009\pthreadvc2.dll
%program_files%\antiviruspro2009\microsoft.vc80.crt\msvcr80.dll
%program_files%\antiviruspro2009\microsoft.vc80.crt\msvcp80.dll
%program_files%\antiviruspro2009\microsoft.vc80.crt\msvcm80.dll
%program_files%\antiviruspro2009\htmlayout.dll
%program_files%\antiviruspro2009\avengn.dll

Remove Antivirus 2009 Registry Values:
(Learn how to do this)
HKEY_CURRENT_USER\software\microsoft\windows\currentversion\run ieupdate

Antivirus 2009 criminal address- BE AWARE!


For those innocent users seeking the information regarding the criminal individuals who are stealing money by selling a bogus software program called Antivirus 2008 and Antivirus 2009 here is their domain address details:

PROTECTEDINTERNET.COM - Domain Informationnew
Domain PROTECTEDINTERNET.COM [ Traceroute RBL/DNSBL lookup ]
Registrar GODADDY.COM, INC.
Registrar URL http://registrar.godaddy.com
Whois server whois.godaddy.com
Created 26-Aug-2006
Updated 19-Dec-2008
Expires 26-Aug-2009
Time Left 228 days 21 hours 43 minutes
Status ok
DNS servers NS1.DSREDIRECTION.COM 204.13.160.15
NS2.DSREDIRECTION.COM 204.13.161.15
PROTECTEDINTERNET.COM - Geo Information
IP Address 208.73.210.121
Host protectedinternet.com
Location US US, United States
City Los Angeles, CA 90071
Organization Oversee.net
ISP Oversee.net
AS Number AS33626
Latitude 34°05'33" North
Longitude 118°25'50" West
Distance 10629.19 km (6604.67 miles)

Registrant:
Deerwood Investments, LLC
7362 Remcon Circle
El Paso, Texas 79912
United States

Registered through: GoDaddy.com, Inc. (http://www.godaddy.com)
Domain Name: PROTECTEDINTERNET.COM
Created on: 26-Aug-06
Expires on: 26-Aug-09
Last Updated on: 19-Dec-08

Administrative Contact:
Manager, Domain deerwooddomains@gmail.com
Deerwood Investments, LLC
7362 Remcon Circle
El Paso, Texas 79912
United States
3124924577 Fax --

Technical Contact:
Manager, Domain deerwooddomains@gmail.com
Deerwood Investments, LLC
7362 Remcon Circle
El Paso, Texas 79912
United States
3124924577 Fax --

Domain servers in listed order:
NS1.DSREDIRECTION.COM
NS2.DSREDIRECTION.COM
===========================================
THIS IS THE SERVER STEALING CREDIT CARDS:

http://world-trusted-payments.com/termsofuse.php

Innovagest 2000 SL
Cl Pedro Teixeira 10, S 25
28020 Madrid
tel: 0034 93 206 0230
fax: 0034 93 206 0231

WORLD-TRUSTED-PAYMENTS.COM - Domain Informationnew
Domain WORLD-TRUSTED-PAYMENTS.COM [ Traceroute RBL/DNSBL lookup ]
Registrar BIZCN.COM, INC.
Registrar URL http://www.bizcn.com
Whois server whois.bizcn.com
Created 01-Dec-2008
Updated 01-Dec-2008
Expires 01-Dec-2009
Time Left 325 days 21 hours 30 minutes
Status clientDeleteProhibited clientTransferProhibited
DNS servers NS1.FREEYOURDNS.COM 84.243.196.136
NS2.FREEYOURDNS.COM 64.86.17.44
NS3.FREEYOURDNS.COM 78.46.86.4
WORLD-TRUSTED-PAYMENTS.COM - Geo Information
IP Address 88.198.0.143
Host world-trusted-payments.com
Location DE DE, Germany
City Gunzenhausen, 02 -
Organization Hetzner Online AG
ISP Hetzner Online AG
AS Number AS24940 Hetzner Online AG RZ-Nuernberg
Latitude 49°10'00" North
Longitude 10°75'00" East
Distance 1203.64 km (747.91 miles)

Domain name: world-trusted-payments.com

Registrant Contact:
Private person
Vitaly Buraev onicdomains@yahoo.com
+74952676435 fax: +74952676435
ul. Akademicheskay 76-23
Moskva Moskovskay oblast 114845
ru

Administrative Contact:
Vitaly Buraev onicdomains@yahoo.com
+74952676435 fax: +74952676435
ul. Akademicheskay 76-23
Moskva Moskovskay oblast 114845
ru

Technical Contact:
Vitaly Buraev onicdomains@yahoo.com
+74952676435 fax: +74952676435
ul. Akademicheskay 76-23
Moskva Moskovskay oblast 114845
ru

Billing Contact:
Vitaly Buraev onicdomains@yahoo.com
+74952676435 fax: +74952676435
ul. Akademicheskay 76-23
Moskva Moskovskay oblast 114845
ru

DNS:
ns1.freeyourdns.com
ns2.freeyourdns.com
ns3.freeyourdns.com

Created: 2008-12-02
Expires: 2009-12-02